First, here is the finished product!
Here are some 'Befores' ...
Yes, that is where I tested paint colors!
You will need:
Power Washer
Scrub Brush
Cement Repair Kit
Tape
Plastic drop clothes
Several gallons of paint (we used 20)
Paint Sprayer
Paint Roller
Roller Pan
Paint Brush
We saved over $2500 doing this ourselves. Although it was a big project, it was worth saving the money to pay someone to do it!
Step 1 : CLEAN the brick! That brick needs to be squeaky clean. Although it may not look dirty, it is! I didn't realize ours was dirty and we had dirt running down the side of the house during cleaning. My husband did this a couple of days before painting day. He power washed the house, and scrubbed in areas that were extra dirty. We also had a couple walls that must've had been covered in vine at some point, because I had to go through and pick some dead vine stems out of the brick! Of course, hubby scrubbed that wall too. We then went around and took vines, grass, plants off the bottom of the walls, so that we could get paint as low as possible.
Step 2: You'll need to get a cement or masonry repair kit. It's important to seal up and cracks, holes - any anything in the brick or cement before you paint it. You don't want water getting in the brick, as the paint makes a sort of seal and can trap the water behind it if it gets in. But don't worry, as long as you repair everything you shouldn't have any problems!
Step 3 : COVER all windows and doors in plastic! Tape off anything you don't want to hit with paint. This is crucial. Although I am not a taper - I'm so glad we did with this project! I was covered, I mean covered with paint by the end of the day, and it was nice not to have to worry about what I touched. This step is especially important if you are using a paint sprayer!
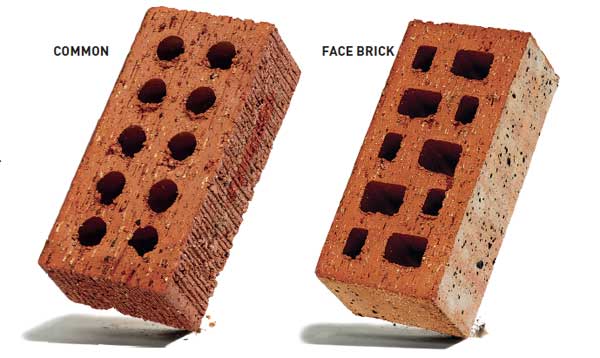
Step 4 : Measure and get paint. We used Sherwin Williams Premier Exterior Latex with Primer and used the color 'white dove' - by Benjamin Moore. The only reason we did this was because I was set on the color but we like to get our paint at Lowe's and they don't care Benjamin Moore. We had to use 20 gallons of paint! However our brick is not normal. We have what they call 'common brick' (okay so maybe it is 'normal').
See those vertical stripes?? Those are all divets that need to be filled with paint! We had to put it on so THICK to get it in these cracks, and then use an 18" roller to push the paint in, and take the paint off the top of the brick so we didn't have drips.
Step 5 : PAINT! We rented a sprayer for $75/day and got it done in one day. We had to use an interesting process because of our brick. We did 2 coats, and the first coat was VERY thick to get the paint in all the cracks. One of us would spray, and the other would follow with a roller to push the paint in, keep drips from occurring. We had to stay close though, because once it started drying the roller would take the paint right back off! After we finished the whole house we went back and did any trim we missed/did touch ups. The whole thing was actually enjoyable!
There was one part around the garage that was going to be too difficult to spray, so I did it with a paint brush and roller. That made me SO thankful we rented a sprayer for the rest of the house!!
Here are our 'Afters' :
Overall our house looks a lot brighter and so CLEAN!! I love white brick for this reason. It looks so fresh fresh and so clean clean. Although I still want to paint the back doors blue gray, repaint all of our trim and get some much needed landscaping and planter boxes in - I already love our house so much better! It's absolutely amazing how much of a difference it has made!
I had a hard time finding DIY tutorials for painted exterior brick, so I hope you find this helpful! Of course if you have any questions email me at brittney@kasselhomeandcottage.com.
Xoxo Brittney


No comments:
Post a Comment