Pages

Saturday, January 30, 2016

Five {Coffee Bars} That Will Make You Melt

Have you ever found yourself using every corner of the kitchen just to get your cup of coffee in the morning? It's rather frustrating. Which is why people starting putting 'coffee bars' in the homes. Everything in one place - it makes so much sense, doesn't it? Not to mention it's totally adorable.

Let's look at some spectacular coffee bars first, and talk about how you can create your own flawless one in your home!


How about this fancy bar by homedit. I'm slightly obsessed with the chalkboard wall as a background, what a genius idea. She has gone all out - and even has fresh pastries out. I could wake up to this every morning! 


I'm in love with this bar by Junk Chic Cottage! I'm a sucker for black and white. Again, she uses the chalkboard background and goes all out with toppings. She did a great job of making this look shabby chic!


This is a great idea for unused built in book shelves! This coffee bar by Brit&Co is awesome! they did a great job of tying in essentials with some decor pieces, like a cake stand and pitchers. This is a super simple and realistic idea for an at home coffee bar.


This is another realistic coffee bar by bowerpowerblog.com She did a great job of turning a clutter-y, wasted space into something that she can easily keep organized! I really love the lighting up top, and again {chalkboard}. For all you people with unused desks in your kitchen - here you go!


Last but not least, a gorgeous coffee bar by Gray House Studio. A bar this fabulous may not be something that would fit well in most homes, but I certainly love it! Great tones and organization ideas.


Tuesday, January 19, 2016

Kitchen Shelves

Good morning blogger friends! Although it's a Tuesday, it feels like a Monday after Martin Luther King Day yesterday - we got very little work done in this house. I'm going to share with you how we made our open shelving in our kitchen this weekend. It was extremely easy, and there have been several requests on instructions! So here we go!

We spent a good 2 hours at Lowe's on Sunday morning. One of our favorite places to go on dates. While my husband planned and bought the materials he needed to build a base cabinet for our dishwasher I picked out shelves, then spent time on Pinterest, Lowes.com, and walking the aisles and came up with a better idea. I couldn't find exactly what I wanted, and if you know me I rarely settle for not exactly what I wanted. So I decided I'd make the shelves I want!

We ended up getting these support brackets from Lowe's. They have them in all kinds of materials and styles, but I really wanted something simple. You can head over to Lowes.com to look at their great selection! The ones in the link say they are 6.5 inches, but ours are actually 8. I didn't check on this, so make sure you do your own measuring before you purchase anything!


Then we picked out an untreated 2 x 8 x 12 board. Our kitchen cabinets come out a little over a foot, and I wanted our open shelving to come out 4-5 inches less than the cabinets. Because they are on the end of our kitchen that is very much open concept, I didn't want it to feel like it was being obtrusive into the openness. 

We spend about $27 on the materials for this. It was SO simple. The brackets came with screws and anchors, and we already had the stain at home. We went back and forth on what color to do the shelves - black, white, or wood. In the end we decided white wouldn't make a statement because our cabinets were white, black might be too heavy for such a light kitchen, and we really don't need another wood tone in our kitchen. So we decided to stain them the same color as our butcher block counter tops - but instead of doing 3 coats of stain just do one. 

As expected the hardest part about these shelves was trying to hang them straight. I usually don't even attempt to hang things straight, but since hubby was so hard at work I figured I would try to make myself useful. I measured to hang the first shelf in line with the bottom of our cabinets. Then I measured, and measured, and used our level, and did the angles, and level again and measure again --- and I think I got them pretty straight! At least the level says so. Here's my progress of hanging them up - and you can see the cabinet progress too ! ha. 


I measured the boards out and then had Steven cut them with his table saw. They were 22.2 inches long, they touch the trim of the window and end at the same spot the countertops do. That way our kitchen has an 'end point', instead of just being so open.. they really helped define the kitchen borders.  After I knew they were the right length, and straight, I sanded them and stained them with dark walnut by Minwax. After they dried we screwed them into the brackets and that was it! It was SO SO easy, seriously anyone could do this! Each bracket said it would hold 80lbs, so each shelf should hold 160lbs. Not that I would put even put that much weight on them, but it is good to know they are sturdy enough to hold our dishes. After they were up I decorated them! I know I need some warm texture up there, I only have glass right now and it's a bit.. cool to say the least. I haven't had the time to spend making them perfect. But here are some pictures of the finished project! 


Now that you've seen how simple this was I hope that you go put together some shelving where you need it! Although a kitchen is a great place for open shelving, the bathroom is another wonderful place! It would also be super fun to decorate them in the bathroom! 

I hope you all are having a wonderful week - and of course, email me if you have any questions about this! info@kasselhomeandcottage.com

Xoxo 
Brittney

Don't forget to follow me on Instagram! We are getting close to 1000 followers, and will be doing our first giveaway soon! Follow at kasselhomeandcottage. 

Monday, January 11, 2016

AFTERS

Finally!! Here are some afters I've been dying to share with you! So they're not complete afters, there are still several little projects left to do - but they are at least updates.

Let's start with the living room. You saw the before pictures in the previous post (if you didn't - just scroll down). I'm sure you've seen some of the small updates on the blog, or Facebook - where ever you like to get your info. Well here are the most recent pics! Actually - so recent that they were just taken this morning.


We still need to put up the trim, but things are starting to look up around here! I finally got my Christmas decorations down, and got around to styling the room for the remainder of winter. Maybe I threw some Spring - y touches in there too. I honestly don't like the cold and I can't wait until Spring! 


The Kitchen --- still needs quite a bit of work! But here is the progress. - P.S. The lighting in this room makes it extremely difficult to get great pictures!!


We still need to reinstall the dishwasher on the right side of the sink and put the countertops back on! The oven will have pull out spice racks on each side of it - yet to be installed. The beam and trim also still need to be put up, and a new center light in the ceiling needs to be put up. It's a process but we are getting there!! 

It is finally starting to feel like home on Lindell. Every time we finish a project it feels more and more like a place I want to be. The hardwood floors in the kitchen were a BIG deal. I can't begin to explain how amazing it feels having the floors in! We love this house and we have loved making it our home.            <3

Check out the 'Our House' page for these and more updated pictures of the office and guest bedroom! 

Don't forget to follow us on Instagram @kasselhomeandcottage

Xoxo

Saturday, January 9, 2016

The Home BEFORE

As we near completion of our kitchen and living room I am getting antsy to share some updated photos! We have done SO much in the kitchen, and it feels like an endless project. I can't even begin to tell you how much detail goes into each addition. This week I am going to put up new pictures of the progress throughout our whole home, and share some details about what we have left to do!  But in anticipation of that I wanted to share the original pictures. I think they are on our home page, but I haven't yet put them in a blog.


After looking at these I'm sure you're wondering what we saw in this house, and let me tell you I still wonder myself sometimes. Ha! There really wasn't much that was attractive to us. Besides the neighborhood the home was in. We have really torn this home apart and rebuilt it from the inside out! (Haven't yet got to the outside.. our poor neighbors) I am so thankful for the blessing of a home, and there have been times throughout this process I have had to remind myself how fortunate we are to have just that! It can be frustrating to put a bunch of money into a home and still have to live through the construction of it. It is a wonderful learning experience and it makes me so thankful for what I have! :)

Happy Weekend, weekenders.

Xoxo

Monday, January 4, 2016

Floors, Floors, Floors

One project we'd really been dreading for a while was installing hardwood floors in our kitchen.

Our whole house was hardwood when we bought it, except the kitchen and bathroom. The bathroom is a story for another day, but the kitchen was a large clay colored tile. When we took the wall down in the kitchen along with a wall of cabinets, we not only noticed the floor in the kitchen was 4 inches higher than the rest of the house, but we exposed sub floor boards that were under the wall and not tile or hardwood. This left us with a nasty, uneven, nail-y crack from the kitchen to the living room, where we desired an 'open' feel. It was our plan all along to put hardwood floors in the kitchen, but we went about as long as we could without me losing my mind before we actually did it!

So 2 days before Christmas Eve (Monday) we went and picked up hardwoods and listened to the clerk's comments like 'You're not actually going to start this project 2 days before Christmas are you'? Which of course we responded 'YES!' and carried on in our over enthusiastic for a project way. Monday morning after our 7:30am gym ritual we headed home, ate some eggs, and took a sledge hammer a the floor! We knew Monday that we would both have 2 weeks work - free, along with lots of family in town for Christmas if we got ourselves in a pickle! So we figured, what better time to tear our house up and have it not disturb our lives? So, we started taking the tile up. OMG it's a click in tile! This is the easiest stuff to take out ever - we thought. No need for a sledge hammer! Just chisel through the grout and lift the tile right up! Super easy. Stack it.. and done with the first layer! It took about 20 minutes. Wow! This is the best project we've ever done! Maybe God's going to give us a break and make this one easy! These were the thoughts I was having at the time. There's something about having your kitchen is disarray that really makes you feel lost, uneasy, irritable, and unsure what the future holds. Call me crazy but every time we take something apart I feel like my life is being uprooted. HA.

So, the floor gods decided they didn't want to cooperate with this 'easy' project we had in mind, and under the tile we found a nice layer of blue and white linoleum. Great, we'll just get rid of that. But under that was a turquoise layer of linoleum. UGGGHHHH I thought. This is disgusting!! Both layers of linoleum were soaked in dog urine, which had its own smell of NASTY! I opened all the doors and windows (luckily it was one of those 60 - in - December kind of days) in hopes of getting the raunchy smell OUT of our house!! Talk about old house smell. Here are some pics of the tear up process - keep in mind these pictures were taken on my i-phone, some deep into the night.


Yep! It smelled as awful as it looked. My husband always gets the worst of the jobs when we work. :( While I took stuff to the dump and cleaned as we went, he was laying all of this nasty stuff trying to saws-all the boards up and make them look good around the cabinets. It was pretty yucky - but still not the worst project we've done. Once we got down to the sub floors it looked like this - and we kind of wanted to leave it like this. 

Oh - but one little problem. When we started taking boards out around the sink we noticed things were damp (palm to face). Although Steven wasn't into it at the time.. I insisted we take all the boards out of the bottom of the sink and see how much was wet. As he watched me rip rotten boards apart I think he started to see the necessity behind the matter! There wasn't much mold, but most of the wood was rotten and soggy. We had a garbage disposal leak and a dishwasher overflow in the Fall.. 2 things that are enough to ruin a kitchen!! We ended up having to take the entire cabinet around the dishwasher to the dump, and we took all the boards out of the sink base cabinet out - leaving only what was dry and exposed. We ended up being lucky! It could have been so much worse. The subfloors were still intact and just a little damp - so we washed them and put a fan on them until they dried. Here is the cabinet completely disassembled, and then a picture of the end of the day when Steven had rebuilt the base of the cabinet. 


Not quite the project we planned on doing during floor laying day - but completely necessary. Not to mention the kitchen smells better than it ever has! Getting all the layers of floor out, and the rotten boards under the sink replaced has created a much fresher smell! :) 

By the time we finished all of this it was about 7PM - time for me to shower and get to our annual Girls Secret Santa Party! I told Steven to wait for me, but of course he was eager to get started laying down the boards! Our goal was to finish the floors TODAY, and there wasn't much that was going to stop us! A couple hours later around 9PM I got home and he had probably 5-6 rows of boards in! We went with a gunstock oak, that was a little bit darker and a 3 1/4" board rather than what we have in the rest of the house which is 2 1/4". Because our floors are 50 years old, fairly damaged and sun stained we knew we couldn't match them. Our goal was to get as close as we could, then go a little darker and do something different (like width) to make them look different, rather than an off match. I'm not really sure if it worked. I don't know what people think when they first see them! Ha. Anyways, here is a picture of the moisture barrier under the wood, and then some of the early boards. 


We ended up having to take a row of damaged boards out of that were already in. Can you imagine how hard taking up 50 year old hardwood floors is?! It was nearly impossible to take a row out without damaging the row behind it. With lots of chiseling, sawing and patience we got it! We made it to our goal at 2:30am that night. Finish the kitchen, leaving only the little hallway in the back for Steven and our cousin-in-law Blake to finish up the little hallway in the back on Christmas Eve! 

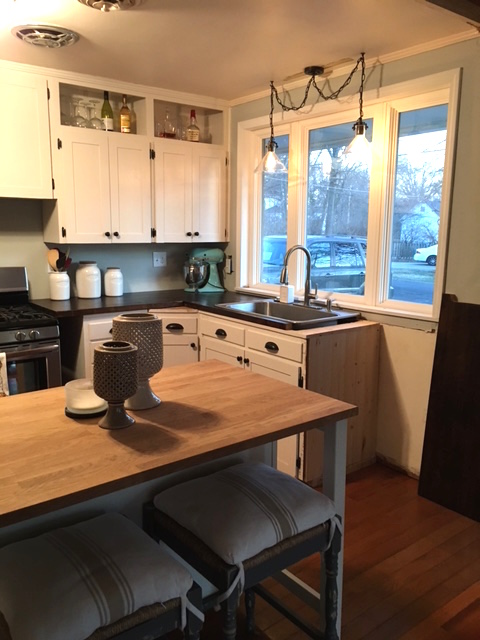
Thanks to those hardworking boys it was finished and cleaned up by the time we were ready for our Christmas Eve Party!! Here are some pictures of the completed project (ignore the overexposure):


We still need to get trim up, wrap the beam, reinstall and build around the dishwasher, and build around the fridge. One frustrating hiccup was that the fridge won't fit in the wall we were hoping to put it in, so the conclusion is we will leave it where it is and make it look 'built in'.


We got new pendant lighting up over the kitchen sink, and build a window sill to finish off the bottom trim of the window. It used to connect to the tile countertop so it had no bottom trim piece. 


Here is the seam between the old and new floors. I think it turned out close to the best it could for trying to transition from old floors!! 

Sorry this was such a lengthy post, but it was a lengthy project!! 

Hope you are all having a great Monday back after the holidays!

Xoxo 
B